Showing posts with label DT Jo Baker. Show all posts

Thursday, 13 March 2014

ELMO'S RAP BY JO


Hi, Jo here again with another layout for Molossi!

I am fortunate enough to have many many photographs of my little girl both posing in her various dance costumes and dancing on stage thanks to the skills of a local photographer who is the official photographer at our local dance eisteddfods.

I wanted to keep the background simple and have the photograph stand out but I had no blue papers or card in my stash which matched her outfit. I resorted to using a Prima mask of bricks with a gel medium (something I’ve not played with before). I love the effect of the gel medium – it gave me a subtle texture to my background which allowed the photograph to stand out from the other black but did not overwhelm anything.

Here are some up close shots of the gel medium brick work.


I love the shine it leaves behind. To this I wanted an embellishment which would again blend but add something to the layout - the stunning Molossi Birdcage # 4 which I wet embossed with silver embossing powder, was a perfect solution. I’ve simply tied some organza ribbon around the top of the cage, punched out some branches with a Martha Stewart punch and some scrap green card, added in a few flowers and bling and finally printed off a butterfly from an online kit I purchased somewhere and fussy cut it.

The title are some glittered chipboard lettering from Bella that I’ve had forever and the flowers and bling are again a mixture from my stash from Kaisercraft and Scrap of Difference. I twirled the wire of a couple of the flowers around a pencil to have spiralling off in different directions from the cluster and die cut a couple of branches using a Couture Creations die with a piece of scrap silver cardstock.

Thanks for dropping by – see if a birdcage works as a lovely girly accent for your next page – Molossi has a number of different designs to choose from. J


Monday, 3 March 2014

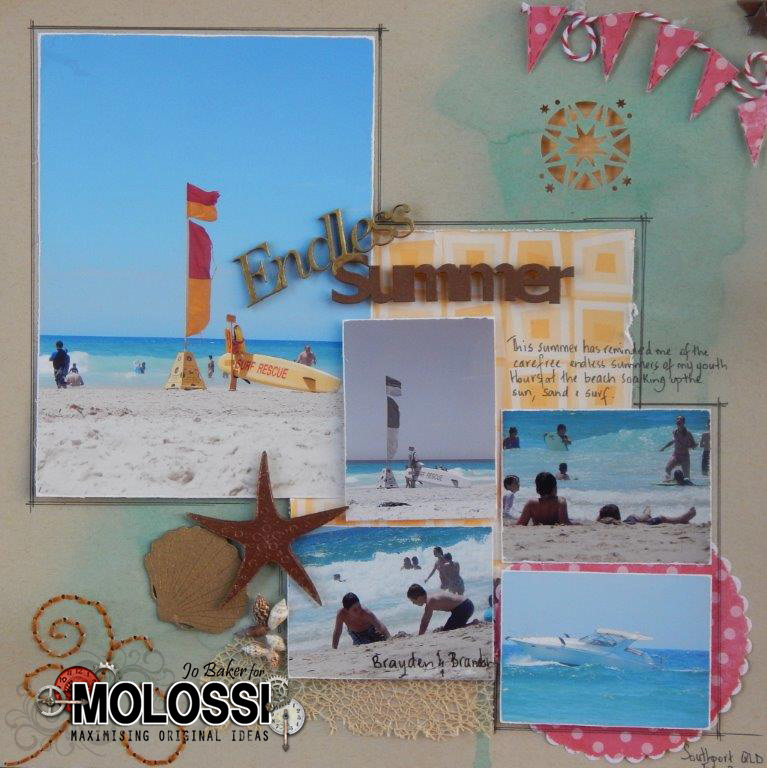
ENDLESS SUMMER BY JO!


Hi Jo here with another layout for Molossi!!  This summer has seen me spend more time on the beautiful Australian beaches than I have since I was a teenager.  It was therefore such a thrill to receive the Endless Summer chipboard title from Molossi in my latest kit.


I decided I wanted two different colours on the title to make the words separate and stand out from each other.  I applied versamagic embossing ink to the word Summer and sprinkled copper embossing powder over it and heated.  I then repeated the process on the word Endless but added a gold embossing powder this time.  I love the end result, even the little bit of gold embossing powder that ended up on the word Summer as to me it looks like sand drifting onto the lettering  

The wonderful thing about using embossing powders to colour your chipboard is they are very thorough – there were no inconsistencies in colour, the entire piece was covered and it looks glossy and gorgeous!

If you haven’t tried using embossing powders with your chipboard in the past – give it a go.  If you have a large flat shape you could even consider dry embossing it first – running it through an embossing folder in your machine and then apply the ink /powders.

The remainder of the layout was just playing with elements – a couple of scraps of patterned paper from my paper drawers, a stitched flourish in the bottom left corner using a Midgemoo template and embroidery thread hopefully gives a movement feel like waves, some Green Tara sand coloured mesh, some sea shells and other chipboard beachy shapes I’ve collected over the years and a little bunting banner across the top right corner, along with a small metal corner which again I picked up somewhere many moons ago!


The little sun was a bit of fun – it’s actually an anywhere punch from Martha Stewart – you can use the punch individually as I have done here or create a whole background of them by placing them side by side or on top and underneath each other – I mounted a contrasting piece of paper behind on foam mounting dots so you would not lose the look of it being punched out of the paper but still have some colour come in behind it.

The finishing touch was simply a very fine black marker and a ruler to draw a border around the photo block and to write in the journaling and I was done.

I’m sure it’s one of those layouts I will look back on and remember this summer fondly – thanks Molossi for the inspiration by way of this title block.

38mm Mesh Sand 1 metre


Photobucket

Wednesday, 19 February 2014

WISHING WELL BY JO


Hello, Jo here again this month! I will apologise in advance for the number of wedding related posts you are going to see from me in the coming months.  My little brother finally tied the knot in December and I was lucky enough to be asked to do the little things that add to a special day like the invitations, wishing well etc.  My little girl was blessed with being one of the flower girls along with my two beautiful nieces.  So, as you can imagine I have a HUGE pile of photographs waiting to be scrapped.

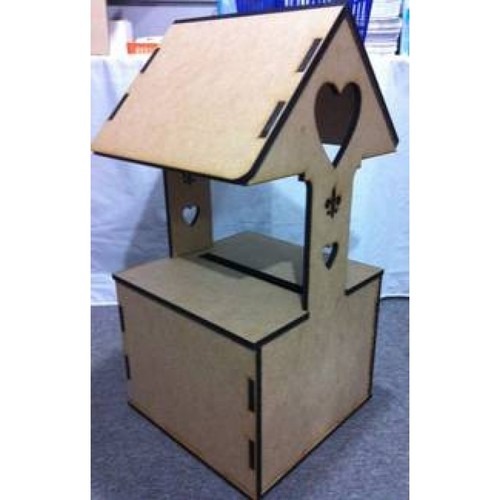
However, today I thought I would show you the Wishing Well as it’s raw version is a Molossi product If you have a wedding coming up or perhaps you make invitations for people as a little business and wish to hire out a well – this could be right up your alley!

The wishing well is laser cut from 12mm MDF and stands 80cm high.  The actual box part of the well is 40cm wide and 30cm high.  When you receive the well it comes in 8 flat packed pieces.  It is really easy to assemble and in fact I decorated mine in pieces and transported it flat from Qld to NSW for the wedding as I didn’t have a great deal of room in my car.  I simply put it together the night before the wedding by tapping the lugs into the correct holes.  To transport it home I simply pulled it apart and brought it home flat packed also J  You can glue it for extra strength but I found this really wasn’t necessary.  It is a very sturdy well and at no stage has it ever looked like it might separate.

Now I’m blessed with a husband who is a spray painter, so I took the raw pieces to him and had him spray them and clear coat them in 2pac car paint!  I knew that no amount of knocking around en-route to the wedding would damage them this way and I simply wrapped the pieces in cloth to avoid any scratches.  However, the edges are black due to the laser cutting and it takes more than a fine mist of paint to cover this.  Out came my trusty Adirondack acrylic paints ( I found a pearl colour which was an exact match to the white pearl paint hubby had used) and two coats with a paint brush on the edges and all was covered perfectly.  As the paint was pearlised and therefore had a sheen of it’s own and it was just the edges,  I haven’t bothered with any clear lacquer over the top.  However,  if you don’t have access to a painter friend and are doing the whole project in acrylic paint I would suggest you then cover in a clear gloss to give your well a shine and protect the paint.
I then ran a fine line of Helmar 450 glue (this stuff sticks ANYTHING) along the edges of the well and added some sticky bling runners also from Molossi.  These runners come in a huge range of colours and even pearl runners – check out this link to see all of them .  Now whilst these are self adhesive, I found that without a bit of added adhesive help the heat affected them and they peeled off.  A quick touch of glue beneath them and they are there for life.  

My final touches was simply a piece of ribbon in the bride’s colour scheme to complete the look. 


 Simply change the colour of the ribbon and perhaps place the bride’s bouquet on the table beside it back at the reception and you have a whole new look.


The lid with the slit in it lifts easily on and off the box allowing you to remove the cards left there by guests at the end of the evening.

If you do have an upcoming wedding, I urge you to pop over to the Molossi shop and check out the huge array of products that will help make that special day even more special.

I’m just waiting  on the official photographs to come back so I can share more of the wonderful Molossi MDF goodies with you – stay tuned.

Large Wishing Well 80cm HighSticky Bling Runner 5 Pack Rainbow450 Quick Dry Adhesive Bottle 125ml


Photobucket

Wednesday, 12 February 2014

STILL YOUR DADDY'S GIRL BY JO


Hi! Jo here!! I have recently returned from a wonderful holiday in Sydney catching up with friends and family and celebrating my younger brother’s wedding.  One of the wonderful things about this visit was being able to sit around with family and reminisce over old photographs and fun times gone by.  I was therefore thrilled to find this wonderful chipboard title from Molossi on my return, just screaming for me to pull out photographs from my own childhood and scrapbook.

I’ve kept the treatment fairly simple for this layout as the photographs already had plenty going on and I wanted space for handwritten journaling.  I’ve simply used a sheet of white cardstock which I added faux stitching around the outer edge to.  The paper is from Kaisercraft and I’ve used a Martha Stewart border punch down the right hand edge and then inked the entire sheet.

One photograph I’ve cropped slightly smaller than the others and this one is actually mounted on foam tape, the other two adhered directly to the patterned paper.  Die Cut stickers from the same range of papers from Kaisercraft is mounted on foam tape with some organza ribbon tied around the base, the branches and birds simply adhered direct to paper.  Add some flowers and bling from Kaisercraft and a flower paper clip from Bella and a few snippets of ric rac and the basis of the layout is complete.

The chipboard title,  Still Your Daddys Girl , from Molossi needed little attention as the beautiful differing fonts make it stand out on it’s own.  I’ve simply painted this in black acrylic paint and adhered to the top right of my layout.  I think you’d agreed it is the first thing your eye is drawn to and hopefully tells the story of the layout.
With a fine black marker I have then handwritten my journaling in the bottom right corner of the layout.

Your Still Daddy's Girl

Photobucket

Thursday, 6 February 2014

ZOMBIES ARE HEADING OUR WAY!!! BY JO


Hi! Jo here with a new project! I feel like the zombies might have captured me and taken me to another planet over the summer holidays break – it’s been so long since I got to sit in the peace of my scrap room and just play. However, today with the children back to school - I’ve arrived back in the real world – my hands are covered in green and red dye and my scrapbooking table is littered with my tools, paper, glue and of course Molossi chipboard!

Tomorrow is my son’s 9th birthday and somehow we’ve gone from toy trucks to killing zombies on his new X-Box games in what feels like the blink of an eye. His request for his birthday cake is a graveyard with a zombie hand reaching out of a grave, his party is zombie themed and I’ve spent far too much time in the past 48 hours researching disturbing images on pinterest for zombie parties, party favours, decorations and the like.

So it seemed obvious that the birthday card for said birthday should also feature this ghoulish theme. I was lucky enough on my return from down south to have another wonderful package of chipboard goodness on my doorstep from the good folk at Molossi. Included in this pack was the chipboard banners which I have used on this card – now normally I would decorate these with bright colours and hang them from some baker’s twine to bring the feeling of light hearted fun – however, on this occasion colouring them to the ghoulish greens featured in the card and using them to look more like the steps to the dungeon below worked a treat.

My little zombie I simply found on a google search – printed onto white card and coloured with my American Crafts markers and then fussy cut. The background was spritzed with Glimmer Mist and the red “blood” spurt is the Pillar Box Cherry Pie Dylusions Ink Spray.

The little word bubble featuring the happy birthday was created using clip art and adding in the text I wanted. Again, I printed onto white card and fussy cut – mounting it to my card with foam adhesive squares.

The little wooden number 9 in the bottom right corner is a packet of numbers I purchased years ago from a cheapie store – I’ve simply spritzed it also with the Cherry Pie Dylusions Ink Spray to keep the colour the same.

Mat the whole piece in black cardstock and add to my white card base and I was done.

It felt good to be back in the creative groove after my hiatus. Thanks for stopping by and taking a look – I promise the next blog post you will see from me will not be ghoulish. In fact, I have some gorgeous wedding joy to share with you including the amazing laser cut words you can purchase from Molossi made to order – hope you can check back soon and see what I’m talking about – till then – See ya!

Cheers, Jo!


Molossi Products used: 
Chipboard Banners