Sunday, 18 August 2013

Our next share is from Leanne using our chippy pieces, and it would be appear this month Leanne is very chippy happy with three layouts also to share:
This is what Leanne has to say


Close up of the Molossi gate which I used gesso on first then I
sprayed with a brown primary elements spray and cut in pieces as
the element behind my photo.


 Some shares for you today using the Kaisercraft Sweet Romance collection, for this mixed media layout. I used a stencil with modelling paste and sprayed a couple of colours of primary elements sprays in the pink tones once it was dried. I used the molossi gates as the element behind my photo with a lovely heart doily, I used laces and collectables from kaisercraft and lovely prima and green tara flowers to embellish the page.

My second share is from the lovely Kaisercraft romance collection as well, I used the prima Lyric paper as the background then cut a floral piece of one of the true romance papers and cut a lace boarder from pink cardstock. I used two of the same photo's and cut them into circles and did a spray of flowers using flourish with a bling pearls, collectables, green tara flowers, prima and dlish flowers and a smaller spray of flowers with the heart doilie. My Molossi piece was the cherish title to my page.
 Close up of the Molossi cherish title which I primed in gesso then painted with Tim Holtz distress paint spun sugar, I then used a brown Gelato around the edges to give a slight distressed look to the title.
 Here is another share using more wonderful Molossi chipboard, I used the Molossi frame as an element behind my photo's I left it plain to go in with the earthy tones of the paper which I don't usually do, but I loved the rawness with the papers. I used the new Kaisercraft Basecoat papers 2, Bo- Bunny and 7 Dots as well with some lovely Green Tara flowers, Prima and Manor House as well.
More of Leanne's work can be viewed at
leannesscrappystuff.blogspot.com.au
Photobucket
We are back from the Newcastle show tonight and when we opened emails very excite to see some GORGEOUS Design Team work. So sit back with a cuppa as we showcase some inspiring work.
First we have Eve. Eve has emailed through not one not two but THREE lovely pages;
Page One 
 
Products used
Molossi chipboard title
Molossi papers
Manor house flowers
Molossi white glitter card
Othe products
Kraft cardstock
Liquid pears
Distress ink


 Layout Two


Products used
Molossi Xmas papers
Manor house flowers
Non molossi product
LYB rubons
Kraft cardstock 
 
Layout Three
 
Products used
Molossi papers
Manorhouse flowers
Molossi glitter white paper to make flower and leaves
Non molossi products
Twine
Rubons
Kraft cardstock

Be sure to follow Eve on her blog for more great designs
Photobucket

Wednesday, 14 August 2013

And last but far from the least is a share from Cathi

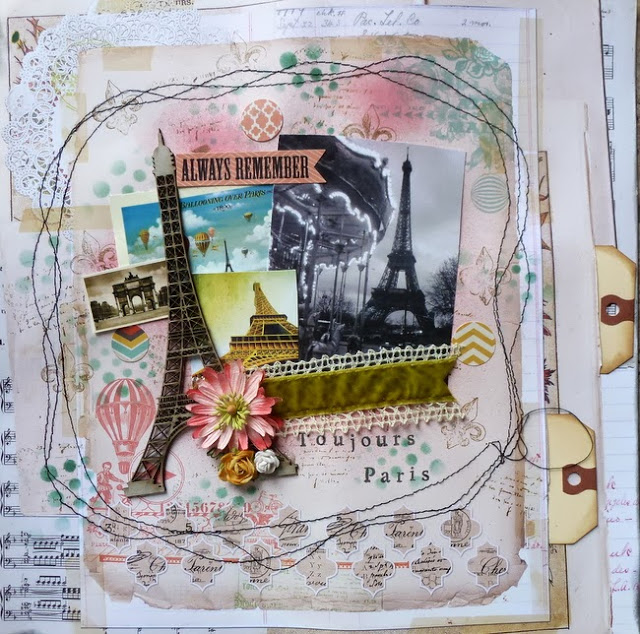
Ah, Paris!! I decided to use some gorgeous vintage images of Paris to make my latest layout, and of course I had to use my Molossi Eiffel Tower.
I used a lot of stamping masking and inking on my background and did a stitched frame around my central motif.

I love the detail on the Eiffel tower chipboard and left it raw to show off those details, I thought the tiny precise cuts on the chipboard would be lost if covered in paint!!
 
Photobucket
Our second for the day comes from Heather 
 MOLOSSI PRODUCTS
Scrapbook paper SP278
Manor House Creation flowers 3000pinkAC13
Manor House Creation flowers 3000purpAC13
Molossi honeycomb chipboard
Molossi bird chipboard
Molossi Pearls (I think they were yours I had in my stash?)
Molossi paper straws
Helmar Glue
Double sided adhesive

 OWN PRODUCTS
Stamp It stamp set
Impress Marker in #7 Pansy to colour stamp
Sizzix doily die & Sizzix bigshot
Linen white card

Hope you like :) I love the Manor House Creation flowers!!! They are gorgeous!


Be sure to check out more of Heathers work at 
www.facebook.com/stationerybyheather

Photobucket
Afternoon one and all we are so lucky to have three special shares today:
The first is
“Beach Boys”
By Joanne Baker


Living in Queensland there is always opportunity to use beach or ocean related chipboard, so I was excited to receive this fabulous anchor and chain from Molossi in my pack for August.  Despite being winter, my son and his mate hit the beach in early July for a day in the sun, sand and water.  The outside temp was a pleasant 23 degrees and the water temp was not far off at 20 degrees.
Firstly I decide to put a pattern onto my anchor using a Crafter’s Workshop template and Sakura Gelly roll pens to give the chicken wire pattern.  I coloured the chain in a silver Gelly Roll pen and then added dimensional magic over the entire piece to give it a gloss and to bring out the glitter in these pens.  I think the chain especially looks much more metal like with this treatment.


Putting this centre piece for my layout aside to dry I started on the remainder of the layout.    I pulled out a piece of Kraft coloured card and randomly spritzed it with Turquoise and Pale green glimmermists, trying to pull out the colours in the water on the photographs – again I set this sheet aside to dry.
Next I printed my photographs in the various sizes I wanted to fit with the layout design and distressed the edges of the main photograph with a simple nail file to make it stand out a little from the others.  I wanted the lifesaver’s blackboard on the layout but did not have room for a whole photo so I trimmed it from a photograph and added it to the white space in my focus photo – pop dotting it to the top right corner.
I printed my journaling into strips on kraft cardstock and after slicing them into strips I ran them through the Cuttlebug in a woodgrain embossing folder from Craft Concepts. – I think lightly inked over the top with a brown ink to make it look like the journaling was printed onto wood.
The papers I have used come from a Kaisercraft range of beach themed papers – one piece I trimmed down to 5” x 11.5” and then used a Fiskars wave border punch on one edge – I then inked the edges of the whole piece with brown ink.    The smaller strip is 1.5” x 11.5” and  I simply distressed both sides of before mounting it a ½ inch from the border punched edge of the other piece of pattern.


I took some paper scraps in co-ordinating colours and pulled out my trusty Cuttlebug and some Sizzie dies to create some handmade embellishments to add to the layout – shells, starfish and even a little bucket and spade give the feel of beach.  I rustled around in my stash and found a packet of tiny shells to add to the embellishment cluster. 
For the title block I found a scrap of paper which looked like wooden planks – however it was black and white and I really wanted the sandy colours so I ran it through the same woodgrain embossing folder as the journaling strips and again added a brown ink over the top.  Tear the edges to make it look like a plank of wood washed up on the beach and ink the edges of the entire piece.  Add some simple alpha stickers for your title and a couple of those smaller starfish I die cut earlier and the title block was complete.
I pulled some medical gauze and some teal cobweb ribbon from my stash also and I was ready to put the layout together.
I started by placing the patterned paper block just inside the left hand edge of the cardstock – now I added the photographs – some were mounted flat to the card, others with foam mounting tape to raise them up.
I added the medical gauze beneath the focus photograph and stretch it across the layout and then added the cobweb ribbon in snippets to fill in gaps.  Now came my centrepiece embellishment of the Molossi chipboard anchor  on the left of the layout – ensuring the top of the anchor overlapped the photograph.  Now  the smaller die cuts and the shells were sprinked around and glued into place.  Lastly the journaling strips were adhered into place where spaces allowed for them best.
Thanks for dropping by – with spring just around the corner I’m sure everyone will have loads of water related photos they can use this wonderful anchor for in their upcoming layouts.  


Be sure to view  more of Jo' work at
 http://www.josscrapofdifference.blogspot.com.au/
 
 Photobucket

Sunday, 4 August 2013

The Lovely Gail has stopped by tonight using some of our chippie pieces on a stunning layout, this is what Gail has told us
I just loved using the Molossi Chipboard Fancy Trims, layered to create a curtain look on my page. I have inked the edges and used suede glimmer mist on them.
I used the Molossi Chandelier, just using dark brown & gold inks to colour
This has complimented the use of the Kaisercraft basecoat 2 papers, Dinky Die Creations flowers and random Charms.
I created the fan using folds and layering the papers with lace and border punched paper.
Hope you enjoy this one as much as I do

Be sure to stop by Gail's Facebook page for more inspiration

Photobucket